A Brief Guide to Becquerel Daguerreotypy
 Daguerreotypy
is back in fashion. Contemporary daguerreotypes are featured
in high circulation magazines, major museums, and galleries.
Perhaps we can understand this odd resurgence as reaction to
the digitalization and apparent sterilization of photography
or perhaps some other early twenty-first century ailment.
Yet, despite the sudden growth in interest, there are very
few practicing Daguerreotypists in the world. There is a reason
for these scant numbers; our Daguerre is a generous but fickle
muse. Despite their ineffable and elusory beauty, Daguerreotypy
is a very difficult and expensive endeavor, yet the rewards
are spectacular.
Daguerreotypy
is back in fashion. Contemporary daguerreotypes are featured
in high circulation magazines, major museums, and galleries.
Perhaps we can understand this odd resurgence as reaction to
the digitalization and apparent sterilization of photography
or perhaps some other early twenty-first century ailment.
Yet, despite the sudden growth in interest, there are very
few practicing Daguerreotypists in the world. There is a reason
for these scant numbers; our Daguerre is a generous but fickle
muse. Despite their ineffable and elusory beauty, Daguerreotypy
is a very difficult and expensive endeavor, yet the rewards
are spectacular.
For me the most gratifying aspect of the Daguerreotype is its presence or--to make up a word--its thing-ness. This seems particularly important in this age of digital reproduction. A Daguerreotype, unlike a screen image and even the most perfect silver, platinum, or albumen print, is foremost a three dimensional object. Made of copper, silver, and glass they are surprisingly heavy, yet seem to fit perfectly in the palm of a hand. Finally, Daguerreotypes are all flawed. Producing a perfect blemish-free image is near impossible. I find something comforting in being forced to leave so much to chance.
A STERN WARNING: Daguerreotypy employs toxic chemicals that improperly handled can do irreparable damage to your lungs, nervous system, environment, family, pets, and neighbors. The author assumes no liability for the risk to, or because of, persons handling any materials or chemicals mentioned below. You alone are responsible to insure that chemicals are handled, stored, and disposed of in a safe and ecologically appropriately manner according to local regulations.
A SECOND ADMONITION: Before attempting Daguerreotypy on your own, please consider attending a workshop with a practicing Daguerreotypist. Although the cost of these workshops may seem high, I believe that they will actually save you both time and money by reducing the learning curve and preventing costly mistakes. A number of workshops are taught every year. Call a craft or photography school near you and ask; if they don't offer one suggest that they do!
Plate Making: Obtaining high quality plates is the first of many hurdles the contemporary Daguerreotypist will face. Preparing one's own plates is not difficult, but like all things Daguerreian does take some effort. Daguerreotype plates are highly polished silver. Only pure silver will work for our purposes. Traditionally, copper plates were clad with silver and then polished. Contemporary plates are primarily electroplated copper.
Preparing Copper: Take a sheet of mirror finish engravers copper, and polish it using a slurry of extra fine grain pumice powder to a flat matt surface with no lines or marks. Taping the plate to an acrylic polishing platform will help secure it. Once polished, wrap the plates in a piece of heavy cloth or flannel and have them plated with pure silver to ½ mil (.0005"). Your plater may require that you drill two holes in your plate for their plating racks.
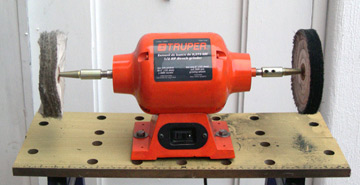 Plate Polishing: Find yourself
a 6" bench grinder with at least ½ horse-power. Remove the
grinding wheels and fit tapered spindles purchased from a jewelry
supply. Next, find a solid mount, and locate the grinder somewhere
that you don't mind getting really dirty. After polishing
few plates, red rouge will be everywhere.
Plate Polishing: Find yourself
a 6" bench grinder with at least ½ horse-power. Remove the
grinding wheels and fit tapered spindles purchased from a jewelry
supply. Next, find a solid mount, and locate the grinder somewhere
that you don't mind getting really dirty. After polishing
few plates, red rouge will be everywhere.
Attach the plate to a piece of ¾" plywood slightly larger than the plate using small nails. Carefully nail the plate down, using at least six, if not eight nails.
Polishing Method: Before polishing you must first decide whether your image will be vertical portrait-orientation or horizontal landscape-orientation. We can never completely erase polishing marks; only lay down finer and finer ones. To prevent polishing from being a never-ending task it is best to situate the polishing marks in a way that they are difficult to see in ordinary light. To do so, make sure that the polishing lines always run up and down the plate, not side-to-side.
First, attach a 60-ply tight-weave fine muslin buffing wheel on one spindle and a 54-ply unstitched fine-finishing buffing wheel on the other. Using a propane torch heat up the plate until all moisture is gone, about 10 seconds. Before the plate cools down turn on the grinder, rub a bit of the rouge on the tight-weave buffing wheel, and beginning from the top rub the plate quickly back and forth horizontally on the wheel while moving the plate slowly upwards. Always begin polishing from the top of the plate; if you begin from the bottom the plate will be thrown from your hands. Once you reach the bottom, flip the plate 180?. Repeat to a total of four times. Add a bit more rouge to the wheel, turn the plate 90? and repeat with four passes. Once completed, move quickly to the finer wheel and repeat four passes in the same orientation as you ended.
After finishing with machine polishing carefully remove the plate from its mount, clean the edges and back of excess rouge, and place somewhere safe to cool off. At this point even the smallest amount of moisture or the lightest touch on the polished surface will send the plate back to the machines for re-polishing. Tarnish and other contaminants quickly build on the surface of the silver, contributing to fog, so sensitize your plates immediately after polishing.
Hand Polishing: While it is not necessary to hand polish, it does serve to lay down very fine polishing marks. The polishing planks are two wooden boards, for half plate or smaller use 7" x 30". Each board has two layers of very soft clean velvet stretched over several layers of heavy felt or flannel. One plank is dusted with dry powdered rouge, and the other is left without rouge. Both planks must be kept clean and dry. Move the plate up and down the buffs with a light amount of pressure. Hold the plate in the same orientation as your future image, to follow the fine polishing lines you left with the machine. Beginning with the rouged board, slide the plate up and down the board 100 or more times with light pressure. Repeat 100 or more times on the rouge-free board, starting with light pressure and slowly reducing to the weight of the plate itself. Carefully remove the plate, and sensitize immediately.
From this point on, the Becquerel process differs from the traditional Mercury process
Sensitization: The polished plate is carefully carried into the darkroom; any marks or fingerprints will send you back to the machines. The darkroom can be safely lit by red or amber safelights, and should be very well ventilated. Standard darkroom ventilation is not sufficient. I recommend a laboratory-grade fume hood, although buying a small demonstration hood and a powerful extractor will work for small plates. If you build your own hood make sure that it extracts evenly all sides. In all cases, buy a vaneometer to test your hood, even if you purchased it new, insuring that the fume hood extracts air from ports or doors at least 100 feet per minute.
The plate is exposed to the fumes of elemental Iodine. At room temperature Iodine creates fumes that rise and react with the silver in your plate to form Silver Iodide (AgI), a light sensitive compound. The traditional Mercury developed method uses other halogens in addition to the Iodine, notably Bromine or Chlorine, to increase the spectral sensitivity and consequently the speed of the plate. Unfortunately these "quick-stuffs" do not work with Becquerel development.
Iodine fumes reacting with silver cause a beautiful color shift in the plate. Charlie Schreiner, the owner and editor of newdags.com, a wonderful reference site for all Daguerreotypists, describes these changes;
When the plate is exposed to Iodine vapor it immediately changes color... First, a pale yellow, then a darker yellow and a sequence follows that progresses through the natural color spectrum--orange, red, purple, blue, green then back to yellow. The first cycle colors are very pastel and the blue and green almost appear clear or slightly gray. Also, they blend together some and have an iridescent quality. [1]
The color is a good indication of how much Silver Iodide has been formed. The plates function and look best with a moderate amount of silver iodide; too little will create a faint and very contrasty image, while too much will produce a gray and flat image. Generally, I have found that the colors towards the end of the first cycle--magenta in particular--works best for me. While the second cycle colors will produce an image, I find them to be too muddy for my tastes. [2]
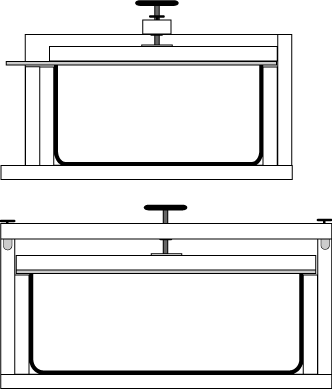 Fuming
Boxes: Unfortunately there are no commercially available
fuming boxes. A few individuals do make them to order, but it
is not difficult to make your own. I base all of my fuming boxes
around glass food storage containers. These are readily available,
cheap, and glass is highly resistant to the corrosive action
of the halogens. A Pyrex 11 cup Food Storage Dish is perfect
for full-plate. The material you choose to make your boxes must
be resistant to corrosive fumes. Teflon, glass, and acrylic are
excellent. Plywood is also surprising resistant. Do not make
your box out of any sort of metal. If possible, do not even use
nails or screws in your box. In general, I have built my fuming
boxes from plywood or acrylic, holding the Iodine in a glass
dish and stopping the dish with a glass or Teflon slide.
Fuming
Boxes: Unfortunately there are no commercially available
fuming boxes. A few individuals do make them to order, but it
is not difficult to make your own. I base all of my fuming boxes
around glass food storage containers. These are readily available,
cheap, and glass is highly resistant to the corrosive action
of the halogens. A Pyrex 11 cup Food Storage Dish is perfect
for full-plate. The material you choose to make your boxes must
be resistant to corrosive fumes. Teflon, glass, and acrylic are
excellent. Plywood is also surprising resistant. Do not make
your box out of any sort of metal. If possible, do not even use
nails or screws in your box. In general, I have built my fuming
boxes from plywood or acrylic, holding the Iodine in a glass
dish and stopping the dish with a glass or Teflon slide.
Fuming: Heat up the polished plate with a hair dryer, removing any condensation that may have formed on the plate. Slide the plate into the box, exposing it to the Iodine fumes. After about 20 seconds, pull the plate out and examine the color by looking at the reflection of a white light off a white surface. If the color is not where you would like it, slide the plate in again for another 5 to 10 seconds. Repeat if necessary. Once the plate reaches the desired color, turn the white lights off, safelight on, and slide the plate over the Iodine for eight second, just enough to erase the effects of the light. It is then removed and placed in a plate holder, making sure not to touch the place or expose it to white light.
Warning: Iodine and its fumes are very powerful oxidizers. It will not only corrode metal, but also will cauterize your lungs and burn your skin. Iodine should always be handled in a fume hood and stored in proper containers. Never touch Iodine crystals, even with a gloved hand. Finally, never heat the Iodine crystals. This is incredibly dangerous and could result in billowing clouds of corrosive and toxic Iodine gas. You should always wear safety glasses and gloves when handling Iodine or fuming.
Exposure: Daguerreotypes are considered "color blind"--sensitive only to blue and UV light--so metering in any regular manner is futile. Unfortunately for the beginner there is no easy way to determine exposure: Prior experience reigns supreme. It is very helpful to keep a detailed record of your fuming times and colors, exposures, as well as development times. Here are a few recent examples of Becquerel exposures:
Landscape, overcast day, 18% Gray (zone V) reading
of 12ev:
6 min @ f/5.6
Landscape, sunny day, 18% Gray (zone V) reading
of 14ev:
2 min @ f/5.6
Head and Shoulders Portrait, overcast day, skin
(zone VI) reading of 12.66ev:
1:45 min
@ f/2.8.
 Developing: no
one has been able to explain exactly how Becquerel development
works. The exposed plate is covered with an Amberlith printing
screen, and is placed under bright light. The red light, to which
the plate is insensitive, reacts with the Silver Iodide and enlarges
Silver crystals, which make up the image. Becquerel developed plates
are about 10 times (2.5 stops) slower than traditional plates,
and usually have a color cast, most often blue.
Developing: no
one has been able to explain exactly how Becquerel development
works. The exposed plate is covered with an Amberlith printing
screen, and is placed under bright light. The red light, to which
the plate is insensitive, reacts with the Silver Iodide and enlarges
Silver crystals, which make up the image. Becquerel developed plates
are about 10 times (2.5 stops) slower than traditional plates,
and usually have a color cast, most often blue.
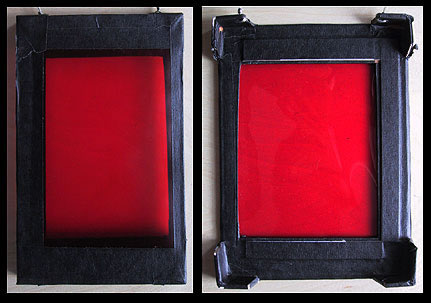
After exposure, place your plate under the Amberlith printer's screen. To make a mask, use lightly colored cardboard or matt board a few inches larger than the size of your plate. Cut a window slightly smaller than the plate and tape a piece of Amberlith over it. Then, tape strips of board on the opposite side of the mask, surrounding the plate, insuring that it can't move during development or touch the screen. I usually tape the plate to the mask from the back. Certainly there are more elegant ways of making a mask, but none easer or more convenient.
Fixing: Remove
the developed plate from the mask in subdued light and submerge
the developed plate into a fresh solution of 18g of Sodium
Thiosulfate in 500ml distilled water. Be sure that the solution
hits the plate at the same time; otherwise waves of discoloration
will form on  the
plate. Fill an 8x10 tray with 500 ml of solution; tip the tray
so all of the fluid is in one end, and place the plate on the
dry end. Quickly and evenly lower
the tray and rock it back and forth for twice the time it takes
to completely clear the plate of Iodine. Wash the plate in
slowly running tap water for five or more minutes and let sit
in distilled water. The image is very delicate at this stage,
and you must be very careful not to touch the image with fingers
or a direct stream or spray of water.
the
plate. Fill an 8x10 tray with 500 ml of solution; tip the tray
so all of the fluid is in one end, and place the plate on the
dry end. Quickly and evenly lower
the tray and rock it back and forth for twice the time it takes
to completely clear the plate of Iodine. Wash the plate in
slowly running tap water for five or more minutes and let sit
in distilled water. The image is very delicate at this stage,
and you must be very careful not to touch the image with fingers
or a direct stream or spray of water.
Gilding: Gilding is the most difficult stage of Daguerreotypy. Gilded plates are more archival, much more resistant to damage, and have more apparent depth and richer tones. However, gilding is expensive and accentuates latent imperfections, apparently creating stains where there were none.
Gilding solution:
Part A: 1
gram of Gold Chloride dissolved in 500ml of distilled water.
Part B: 4
grams of Sodium Thiosulfate dissolved in
500ml of distilled water.
To make the gilding solution, add one Part A to one Part B. This means add the Gold to the Sodium Thiosulfate, the other way will precipitate the gold and ruin the solution. Allow it to sit for a full day. Keep the solution stored in a brown bottle.
How to gild: Placed
the fixed and washed plate on a level laboratory stand, and quickly
cover with gilding solution before it dries. Carefully pour the
solution on the plate so it forms a meniscus that covers the entire
surface. It is not difficult to do, but does take some practice.
Make sure the plate is level or the gilding solution will 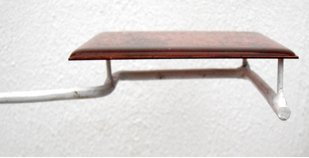 run
off.
run
off.
Once the plate has a good meniscus, light your propane torch, and begin smoothly moving the flame over the bottom of the plate. The goal is to bring the solution just under the boiling point. It should steam and produce small bubbles, but never actually boil. Keep the torch moving so the heat is evenly dispersed.
Carefully watch the plate for the stains that will appear about halfway through the process. The whole plate will become darker, and a few stains will appear on your plate. Keep heating until the plate lightens and the stains disappear. This is a judgment that requires lots of practice and careful observation. It is far better to slightly over-gild, which creates a pleasant yellow-gold tone, than to under-gild, which leaves behind those nasty stains and a dark plate. Watching the plate in negative form, with a white wall behind or outside with the sky above, helps tremendously. An easier but more expensive way of gilding is to dedicate a small frying pan, stainless steel, or Pyrex-type glass container that can be placed directly onto a hot-plate or other heat source. The plate and enough solution to completely cover are heated until gilded, following the instructions above.
Washing: Once gilded the plate should be washed for five or more minutes in slowly moving tap-water. After washing in tap water, allow the plate to sit in distilled water for a few minutes before drying. If you don't gild you may want to consider adding a bit of Photo-Flo or other drying aid to reduce drying marks.
Drying: Remove the plate from the distilled water, and holding it at an angle, use the hot air from a hairdryer to push all of the water to the end of the plate, where it can be soaked up by a rag or paper towel. Careful not to touch the plate with the dryer!
Mounting: Once dry immediately mount the plate behind glass using a high-quality pH-neutral tape. A thin matt between the glass and the plate's surface will prevent the glass from scratching the plate. Once mounted, keep your Daguerreotype dry and out of direct sunlight, and it should outlast any of us.
Secure
the Shadow
'Ere
the Substance Fade
let
nature imitate what nature has made
-- Advertisement from a 19th Century Daguerreotypist
SUGGESTED Readings and Research Resources
Journals:
Daguerreian Annual (Daguerreian Society, Pittsburgh,
PA. 1990)
Manuals:
Hill, Levi L., Treatise on the Daguerreotype (1850)
Humphrey, S.D., American Hand Book of the Daguerreotype (1858)
Nelson, Ken. A Practical Introduction to the Art of Daguerreotypy
in the 20th Century. (Arizona State University, Tempe, AZ 1977)
Scientific Studies:
Barger, Susan and William White,
The Daguerreotype, 19th-century Technology and Modern Science (Smithsonian
Press, Washington DC. 1991)
Pobboravsky, Irving. A Study of Iodized Daguerreotype Plates.
(Rochester Institute of Technology, Rochester, NY 1971)
dangerous Daguerreian Experiments
Make your own Bromine: http://www.crscientific.com/article-bromine.html
Silvering glass: http://www.earlham.edu/~rodrimi/Silvering.htm
IMAGE CREDITS
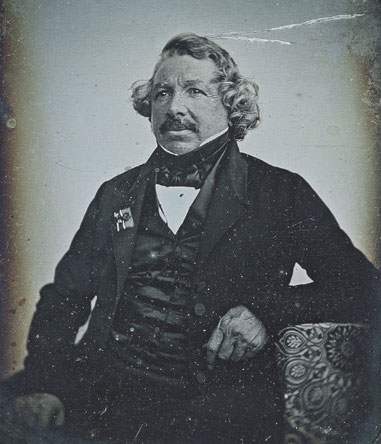
Image
1: Daguerreotype
Portrait of Louis-Jacques Mandé Daguerre
Jean-Baptiste
Sabatier-Blot, 1844
Image
2: Truper
6" Bench Grinder with Spindles and Buffing Wheels
Jason
Greenberg Motamedi, 2006.
Image 3: Fuming Box Diagram (Motamedi, ibid)
Image 5: Amberlith Mask (Motamedi, ibid)
Image
6: Glass
Spirit Lamp
Bland & Long Photographic
Apparatus and Chemical Preparations, 1856
EQUIPMENT
Camera Equipment: I am using relatively modern equipment, most of which was purchased second-hand, some on eBay and some from Midwest Camera Exchange or Badger Graphics.
Camera: My main camera for is a Canham TD57, a modern wooden field-camera with interchangeable 4x5 and 5x7 backs. For full plate images I use an 8x10 Deardorff as well as a traditionally designed daguerreotyping camera made by Ray Morgenweck fitted with a period lens.
Lenses: Due to the Daguerreotype plate’s low sensitvity very fast lenses are important. If you plan on portraiture you should try to get as fast a lens as possible. I have found the Schneider 150mm f/2.8 Xenotar to be the best compromise between speed and sharpness. The Dallmeyer 8” f/2.9 Pentac, while a mediocre performer, is an affordable lens. Do not be tempted by the cheap surplus Kodak 7” f/2.5 Aero-Ektar, they are useless for Daguerreotypy due to the brown staining of rear element. I would also recommend considering Petzval portrait lenses.
Plate holders: For 5x7 and smaller I use Linhof 4x5 and 13x18cm double-sided glass plate holders, which use a clever pressure plate to make sure the plate the proper distance in relation to the plane of focus. I have a number of adaptors for these holders to I can use them with 1/4 and 1/2 plates. For whole-plate I use a Graphic 8x10 plate-holders with reducing adapters.

Linhof 4x5 Double Plate Holder
Accessories: Due to insensitivity to red and yellow, it is not possible to directly meter with daguerreotypes. However, I use 1° Pentax digital spot-meter to get an approximate reading, and adjust the exposure according to experience. A compendium lens-hood should be considered a necessity, as they reduces flair, a serious problem with fast lenses.
Fuming Boxes: See my
diagram.
Chemicals and Lab Equipment:
Polishing:
Fabric:
Plates and Platers:
Rembrandt Graphic for Mirror finish engravers copper
Theiss Plating (314) 961-6526
(Theiss also sells prepared Daguerreotype plates)
Daguerreotyping Equipment:
Century Darkroom (Mike Robinson)